Introduction to Git and GitHub
1 Introduction
1.1 What is Git?
Git is an open source program for version control: It helps you to keep track of different versions and changes to virtually any kind of files. Git is a powerful tool whenever
- you continuously work on files over a longer time period,
- you collaborate with others and jointly make changes to one, several or (very) many files.
Tools for version control, such as Git, are an important tool for software development. But also if you do not work with software, keeping track of changes to files can be very helpful, for example, if you work on a thesis, a project report or a presentation.
You can assume that basically any kind of software product you use has been developed using version control. A big argument in favor of using Git is that it gives you control over changes. This sounds easy. But if you work on multiple files, which might be complex and depend on each other it really pays off. This is true if you work alone, but even more so if you collaborate with others and try to align the changes with your colleagues. Software development is the prototypical use case for Git, for example look on the GitHub repository of scikit-learn, a popular open-source library for Machine Learning in Python: It is based on contributions from over 2,400 developers collaborating on more than 1,500 files. It is because of version control (with Git) that so many collaborators do not mess up the files they are working on simultaneously.
You can learn more about What is version control? in the video below.
What is VCS? (Git-SCM) • Git Basics #1 from GitHub on Vimeo.
Git itself is a tool which can be used through the command line. However, there are also graphical user interfaces (GUIs) available that facilitate its use by non-technical users.
You can learn more about What is Git? in the video below.
What is Git? (Git-SCM) • Git Basics #2 from GitHub on Vimeo.
1.2 What is GitHub?
As we just learned, Git is a software for version control. GitHub adds some extras to working with Git. So we might first clarify the differences between Git and GitHub.
Git is a version control software, which is installed on your local computer. It offers very useful features for version control, like branching.
GitHub is a hosting service for Git repositories. By being entirely based on the cloud, it facilitates collaboration based on Git. Moreover, it offers some tools designed for collaboration, like issues and pull requests.
Many developers and organizations build on GitHub which makes it the biggest development platform on the globe. Watch the video below to get a rough idea for what you can use GitHub.
2 Getting Started with Git and GitHub
In the following introduction, we will focus on using version control with Git and GitHub. First of all, you need to create a GitHub account. When registering at GitHub, you may want to read this advice from Happy with Git.
As a student, you are probably eligible for a GitHub Student Developer Pack, which gives you access to many developer tools and GitHub pro.
2.1 Basic terminology
GitHub uses Git to track all contributions made by contributors to a project – so you know exactly where every line of code came from. Let’s start with the basics.
2.1.1 What is a GitHub repository?
A so-called GitHub repository is used to organize a project. It can hold all files related to your project. A repository can either be public (= visible to everybody), or private (= visible to some GitHub users only). We created a little demo repository, which you can find via https://github.com/DigitalCausalityLab/demo_repo. A screenshot explaining the basic layout of a GitHub repository is provided in Figure 1.
The markers in the screenshot show
- [1] The url of the repo.
- [2] The name of the repo.
- [3] The code view, which basically shows all files and folders in the repo.
- [4] A readme file called
README.md. - [5] A rendered version of the readme file.
- [6] Some additional information on the project, including a brief description, as well as a list of the contributors.
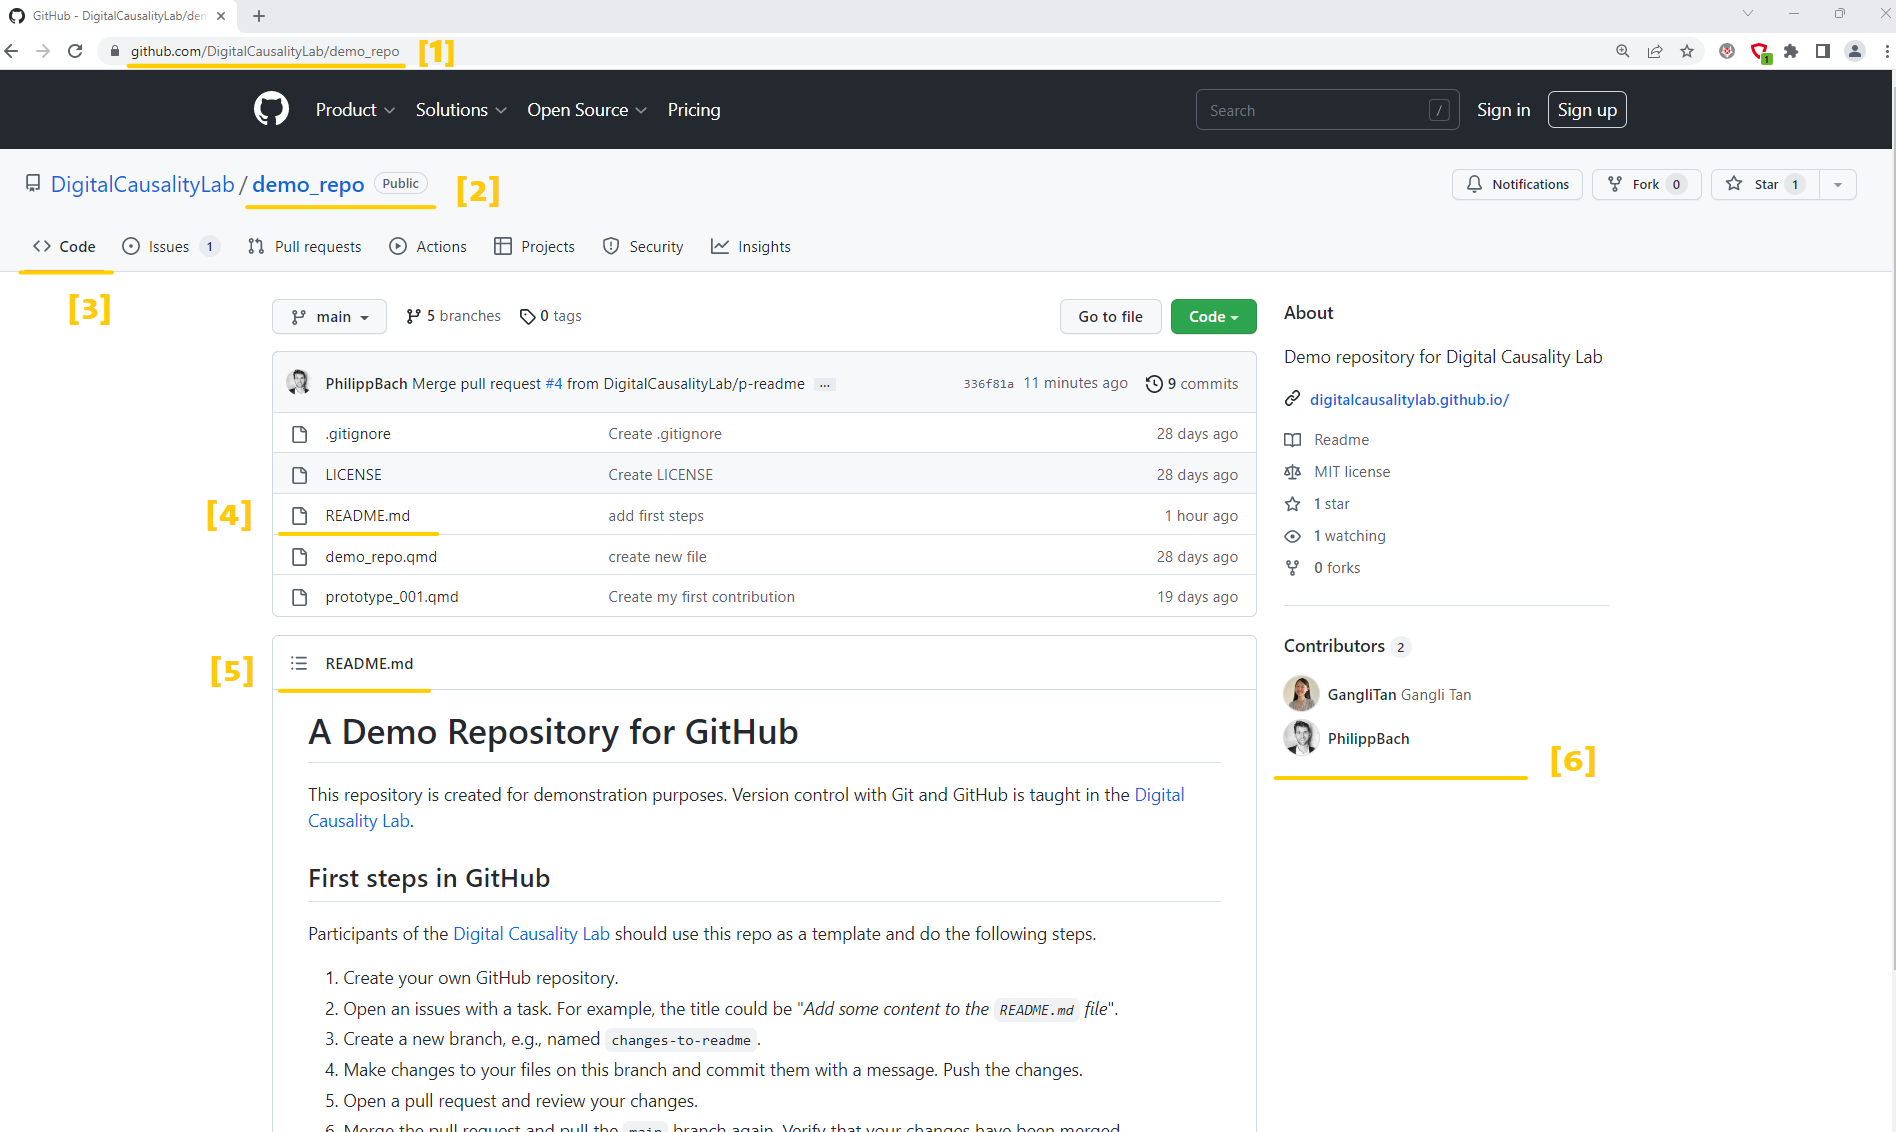
As GitHub is a hosting service for Git repositories, you can access a repository with your browser by just typing the corresponding url. The url is typically set up in the way https://github.com/[USERNAME]/[REPONAME]. The user name can refer to a personal account or to an account of an organization. The name of the repo itself is again shown in [2].
The code view in [3] is basically showing a list of all files and folders included in the repository. These files may contain the project code, documentation, and other important files. Any changes to these files will be tracked via Git version control.
The readme file README.md in [4] is a special file that is recommended to be contained in all repositories. The readme file should contain some information that visitors and contributors might find useful when they come to your repository for the first time, for example, the goal of the project as well as some general information. GitHub automatically looks for this file and helpfully displays it below the repository, see [5].
Moreover, GitHub shows some extra information to your project on the right-hand side. For example, it shows a short description of the project, some keywords that help others find your repo, as well as a list of the contributors.
Register and login to GitHub.
Visit the demo repository https://github.com/DigitalCausalityLab/demo_repo and make yourself familiar with the structure of the repository.
Open the file
README.mdand compare it to the rendered version in the repository.
2.2 The basic workflow with Git and GitHub
A key feature of the basic workflow of Git and GitHub is so-called branching. Basically everything in Git and GitHub is contained in a branch: A branch is a parallel version of the repository. When you create a new repository, GitHub automatically creates one branch, the so-called default branch which is typically named main or master. Whenever a contributor wants to add some changes to your repository, they will open a new branch which is basically a copy of the main branch. The branching approach comes with the advantage that the developers cannot break the default branch by including their changes. Once the changes reach a certain maturity, they can be merged to the main branch. When multiple persons changed the same file at the time and run into conflicts, it is possible to resolve them before merging.
Every GitHub repository has a network graph (see Figure 2) that visualizes the branches. You can open it by clicking on Insights > Network or access it via the url extension network in https://github.com/[USERNAME]/[REPONAME]/network, for example https://github.com/DigitalCausalityLab/demo_repo/network.
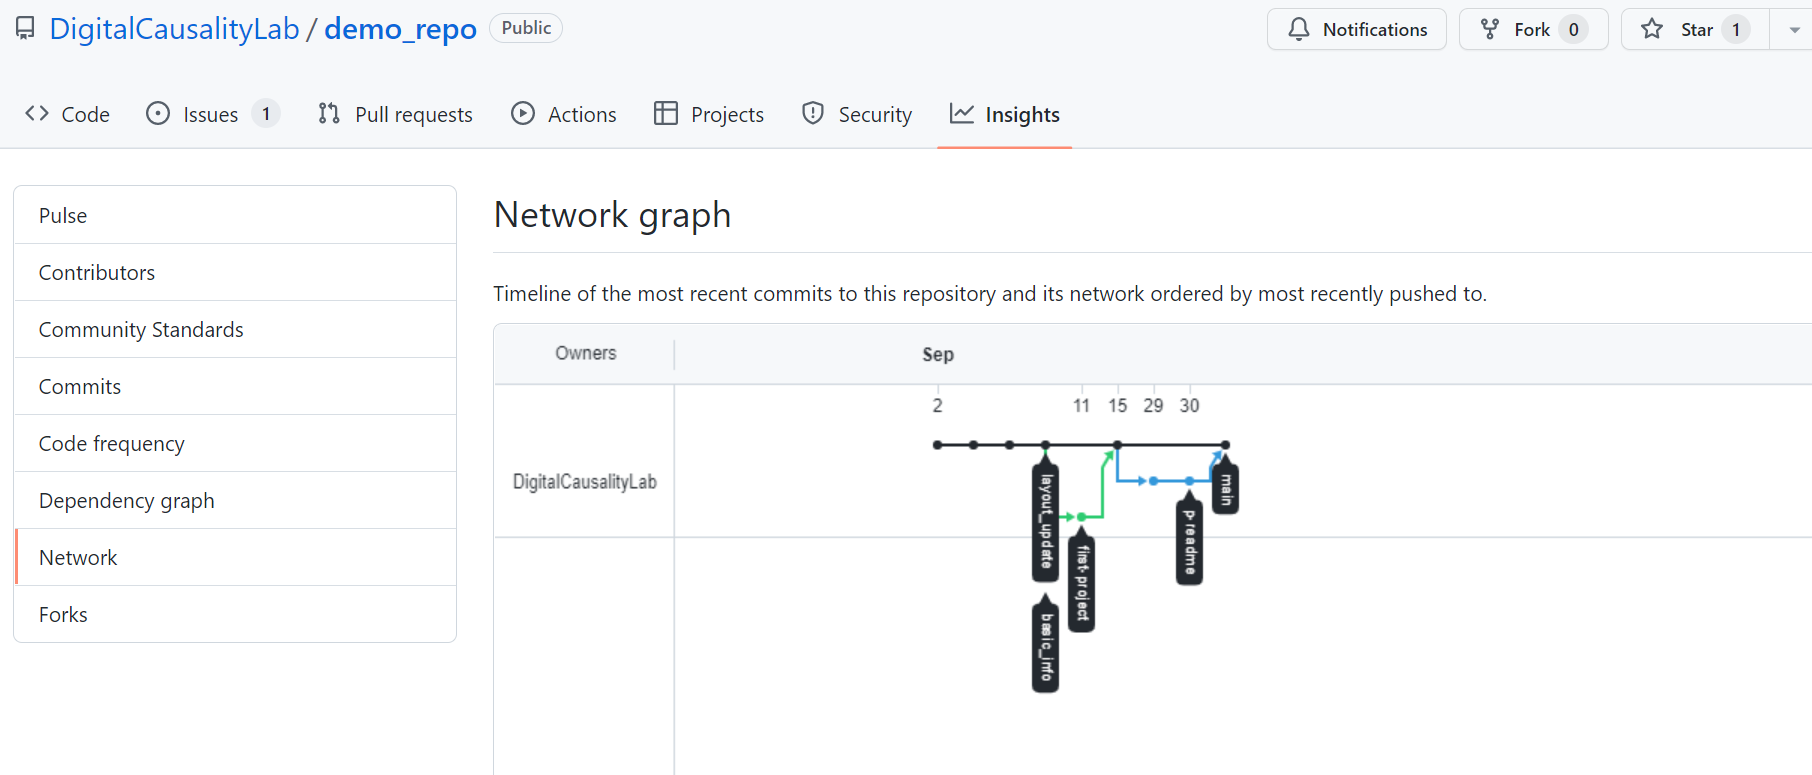
Can you see the different branches of the demo repository?
Go to the network graph and try to describe what the latest 5 changes were about.
- Who made the changes?
- Do the branches correspond to issues and pull requests?
Create your own GitHub repository! You may find this link helpful.
Have a look at this article which explains the main steps of the GitHub Flow - the standard workflow for GitHub beginners. There are also more complicated workflows available, which might be more suitable for bigger projects.
2.3 What is an issue?
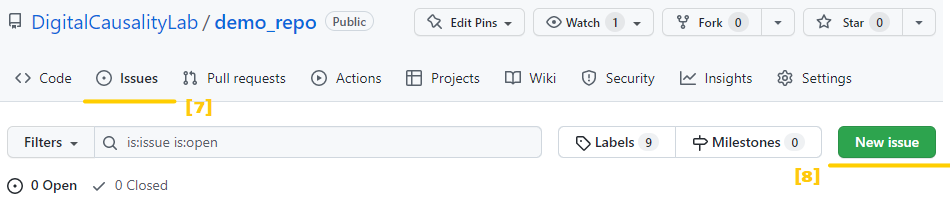
Issues [7] are used to discuss ideas, enhancements, tasks, track bugs (= errors in the code) and feature requests. Issues can be created [8] by anyone (for public repositories), and are moderated by repository collaborators (see Figure 3).
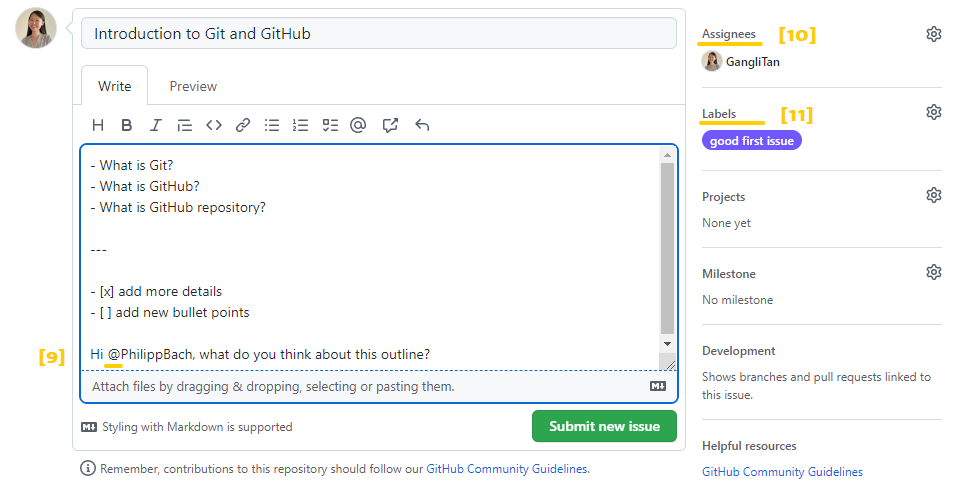
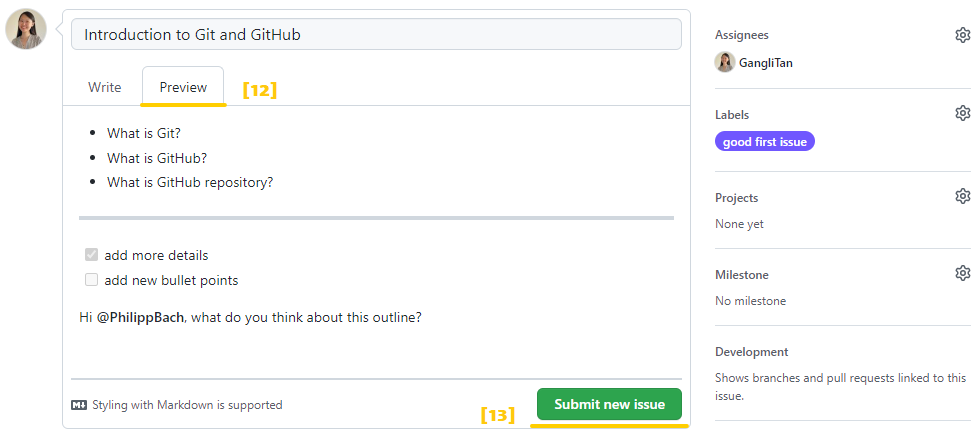
GitHub uses a syntax called Markdown to help you add basic text formatting to issues.1 One of the most helpful features is the @-mention [9]. When you @-mention someone in an issue, they will receive a notification, even if they are not currently subscribed to the issue or watching the repository. You can also assign [10] an issue to specific team members or even yourself and categorize it with labels [11] (see Figure 4).
You can use the preview [12] tab to see how your comment will be rendered. Click the green button to submit new issue [13] (see Figure 5).
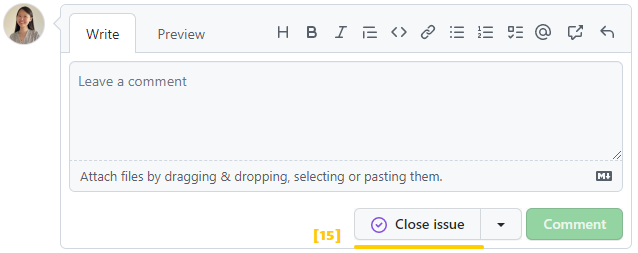
Each issue contains its own discussion thread. Click the green comment [14] button to add your comments to the discussion (see Figure 6).
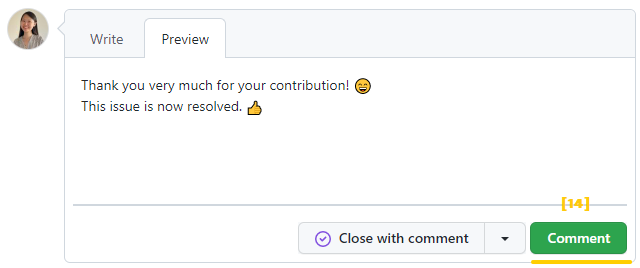
Once you have completed the tasks in the issue, it’s time to close it! Closing an issue [15] tells other contributors that this particular conversation or task has come to an end (see Figure 7).
2.4 Going through the GitHub Flow: Changes to the README.md file
Let’s go through the GitHub Flow step by step.
2.4.1 Step 0: Create a repository
If you haven’t done so far, it’s time to create your own repository now.
- You can either navigate to your GitHub profile, go to the repositories tab and click on “New” (see Figure 8), or,

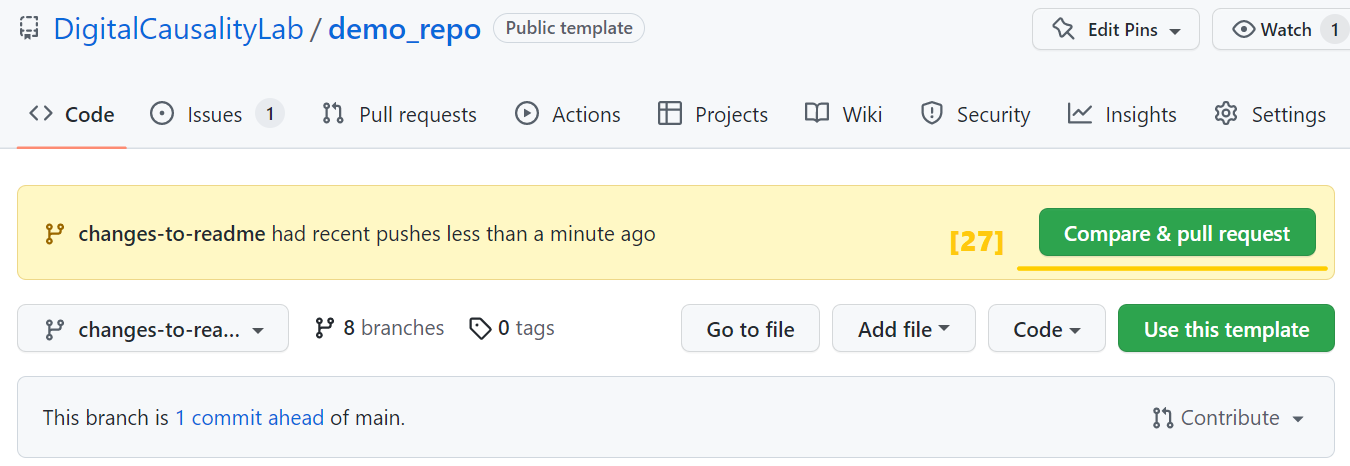
- You can use this template by clicking on the “Use this template” button (see Figure 9).

When you start a new repository using the demo repository template, a README.md file is contained in your repo by default. In case you create a new repository on your own, you can indicate that a README.md file should be contained, too.
2.4.2 Step 1: Open an issue
Open an issues with a task (see “What is an issue?”). For example, the title could be “Add some content to the README.md file”.
2.4.3 Step 2: Create a branch
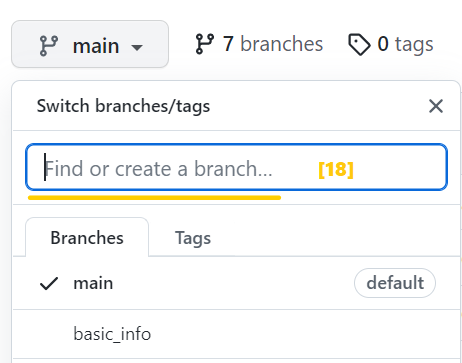
Start a new branch. You can navigate to the Code tab [16], and click branch main [17] in the drop-down (see Figure 10).
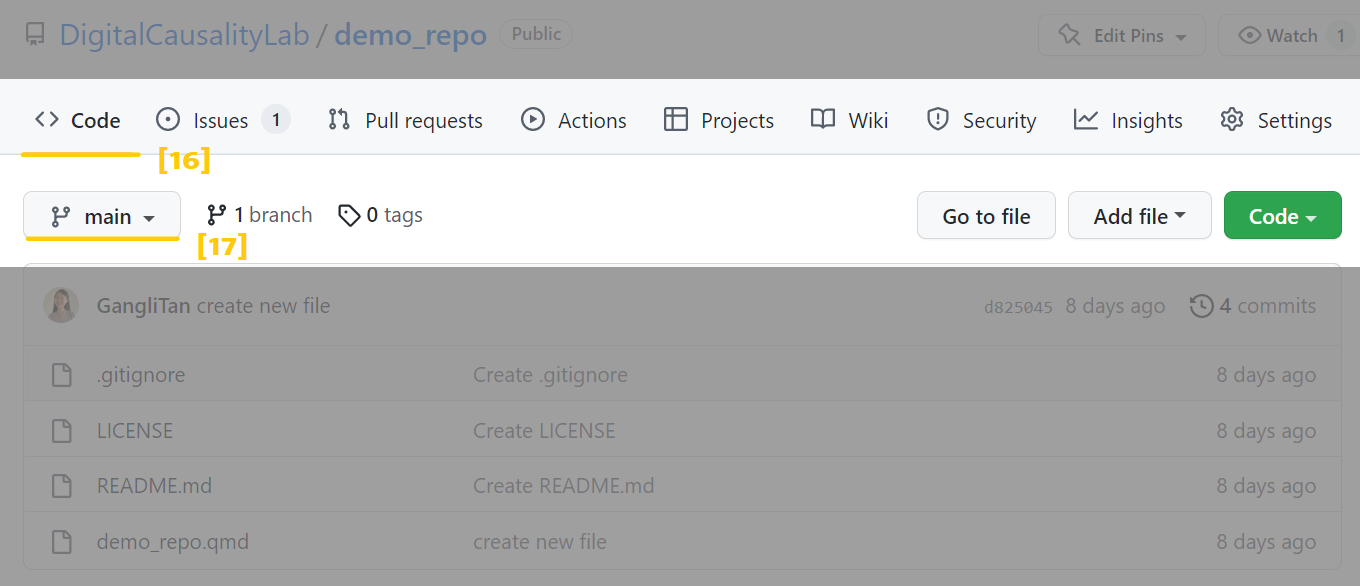
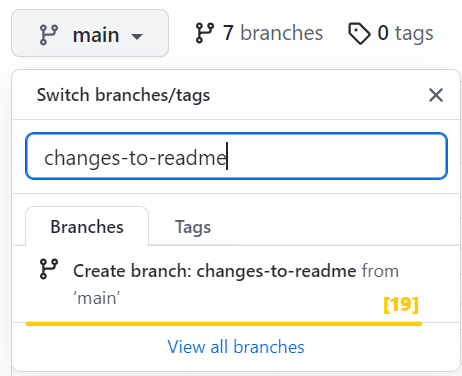
In the field of Find or create a branch [18], you can enter a random name for your branch, like first-project, new-app or anything else. Here we name it changes-to-readme and click Create branch [19] or press the Enter key to create the branch. (see Figure 11).
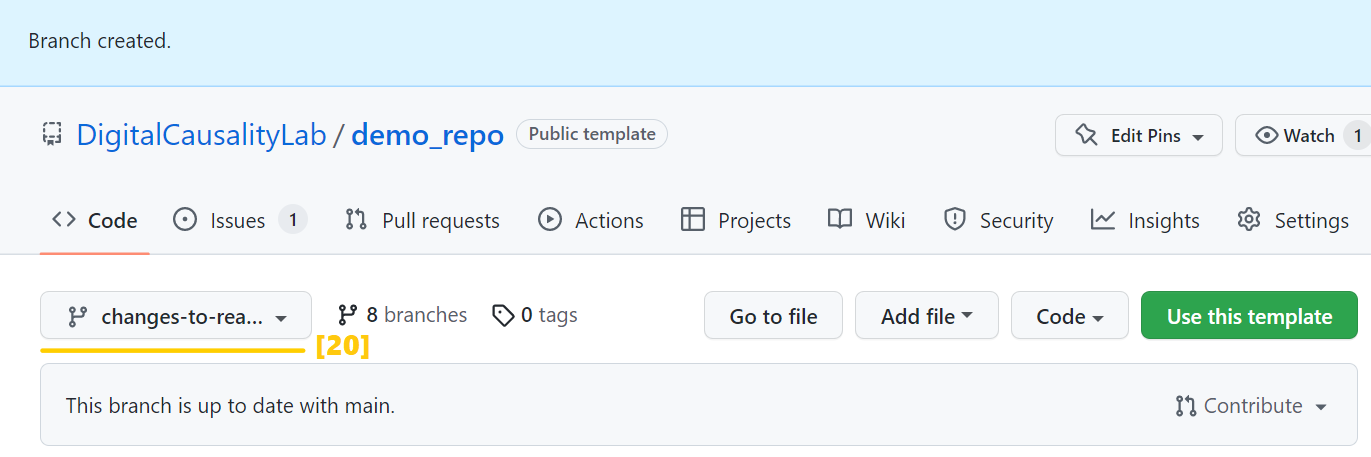
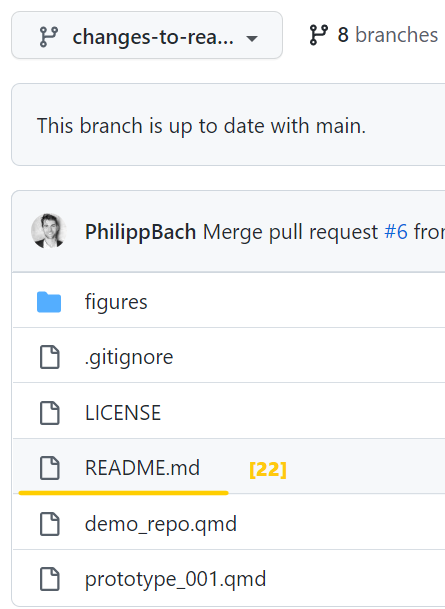
🎉 Congratulations! You just created a new branch [20] (see Figure 12)!
2.4.4 Step 3: Commit a change
A commit is an individual change to a file (or set of files). When you make a commit to save your work, Git creates a unique ID (a.k.a. the “SHA” or “hash”) that allows you to keep record of the specific changes committed along with who made them and when. Commits usually contain a commit message which is a brief description of what changes were made.
The following steps will guide you through the process of committing a change on GitHub.
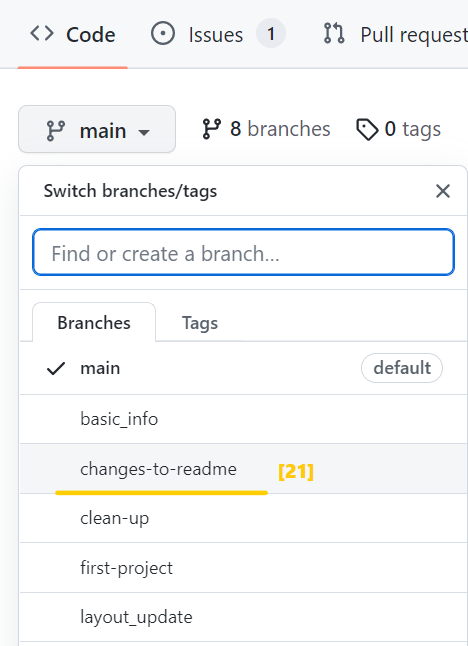
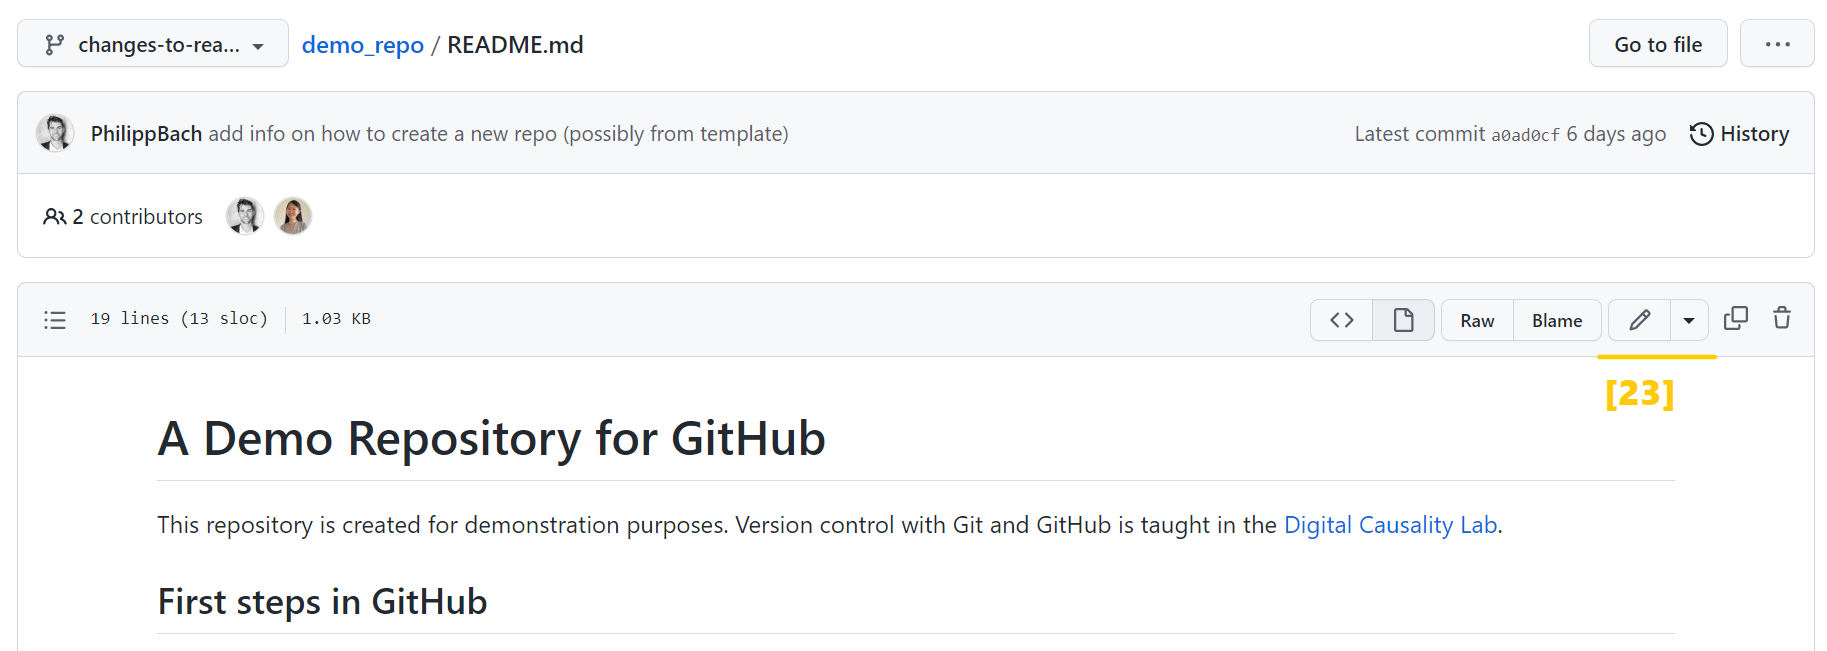
- If you are in the main branch, please return to the code tab and select the branch changes-to-readme [21] in the branch drop-down and click
README.mdfile [22] (see Figure 13).
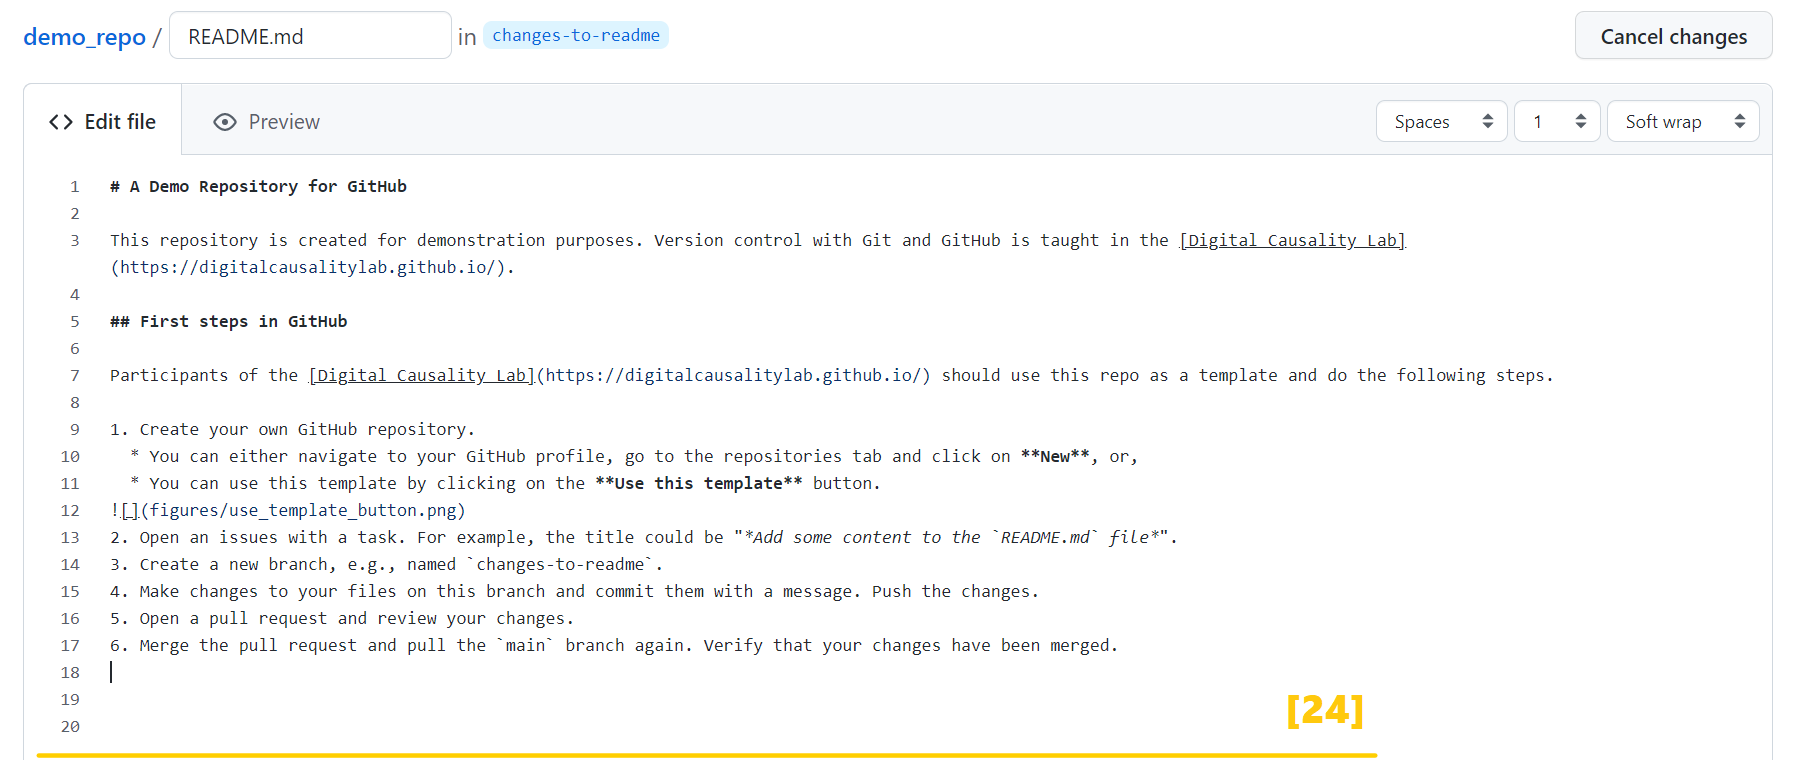
- Click edit this file [23] and add some new content [24] (see Figure 14).
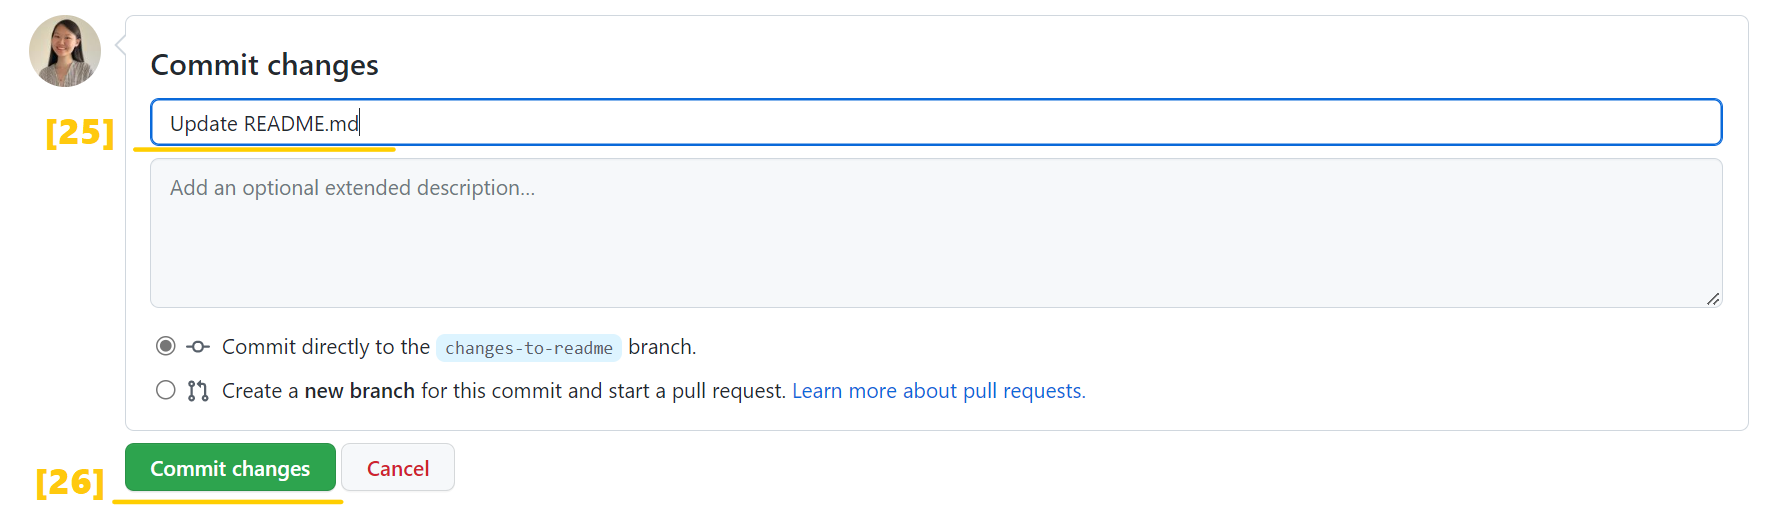
- Commit the change by entering a commit message [25] in the text-entry field below the file edit view, e.g. Update README.md, and click Commit changes [26] (see Figure 15).
🎉 Good job! Now you made a new commit!
2.4.5 Step 4: Open a pull request
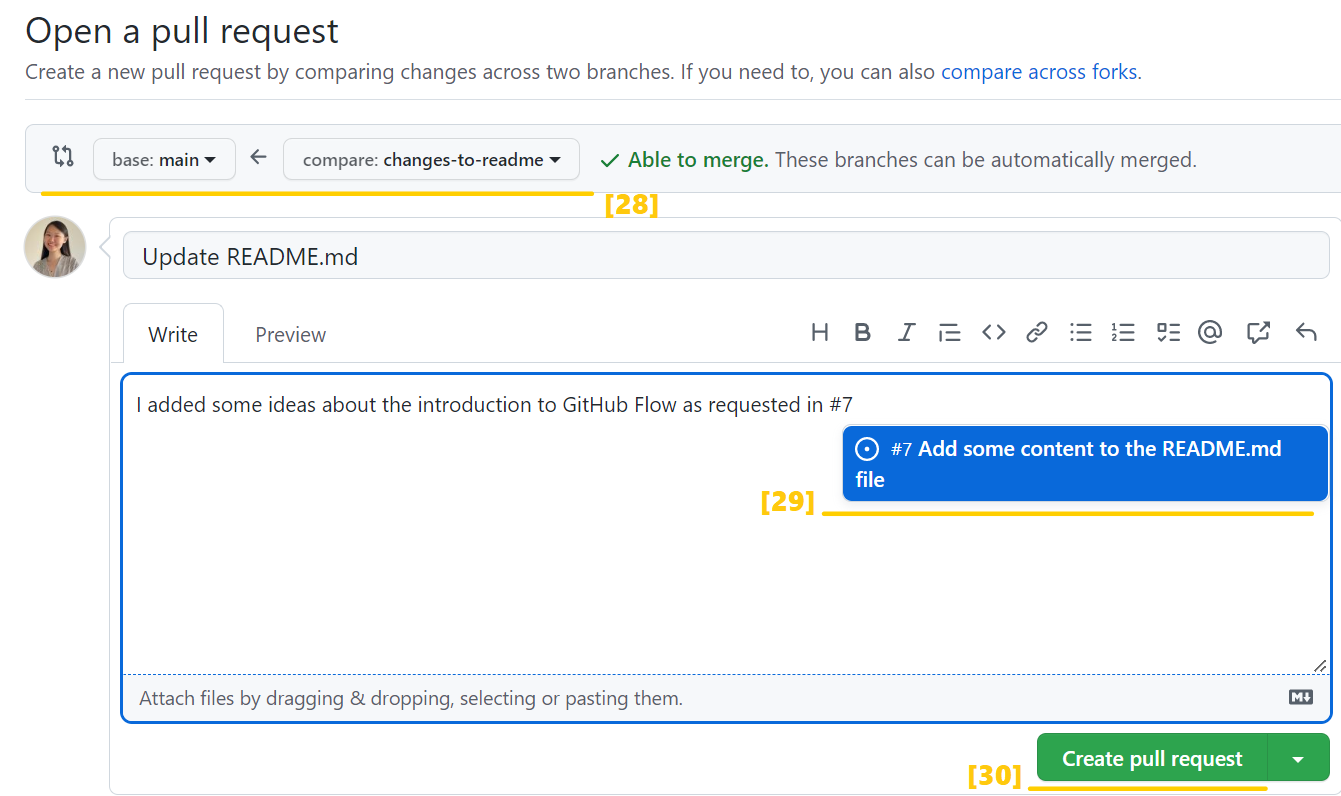
It’s time to share your proposed change through a pull request [27]! Where issues encourage discussion with other contributors and collaborators on a branch, pull requests help you share your changes, receive feedback on them, and iterate on them until it’s merged into the main project. Now click the green button to start your pull request (see Figure 16).
Notice: We can use the drop down [28] to compare any two branches. Here we will leave the default selected. GitHub prepopulates the pull request title with your commit message, but you can update this to help your collaborators better understand the intent of your change. Below you can leave a comment to describe the changes you made and why. As a best practice, you should reference the original issue or issues using the number sign notation [29]. When you are finished, choose the option to create pull request [30] (see Figure 17).
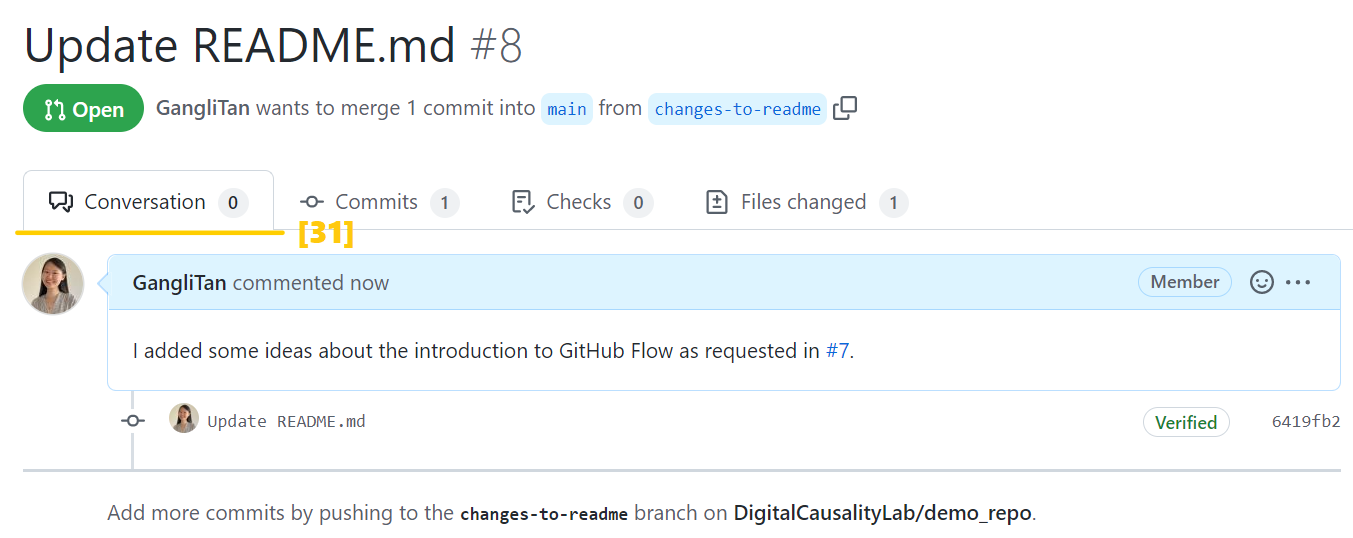
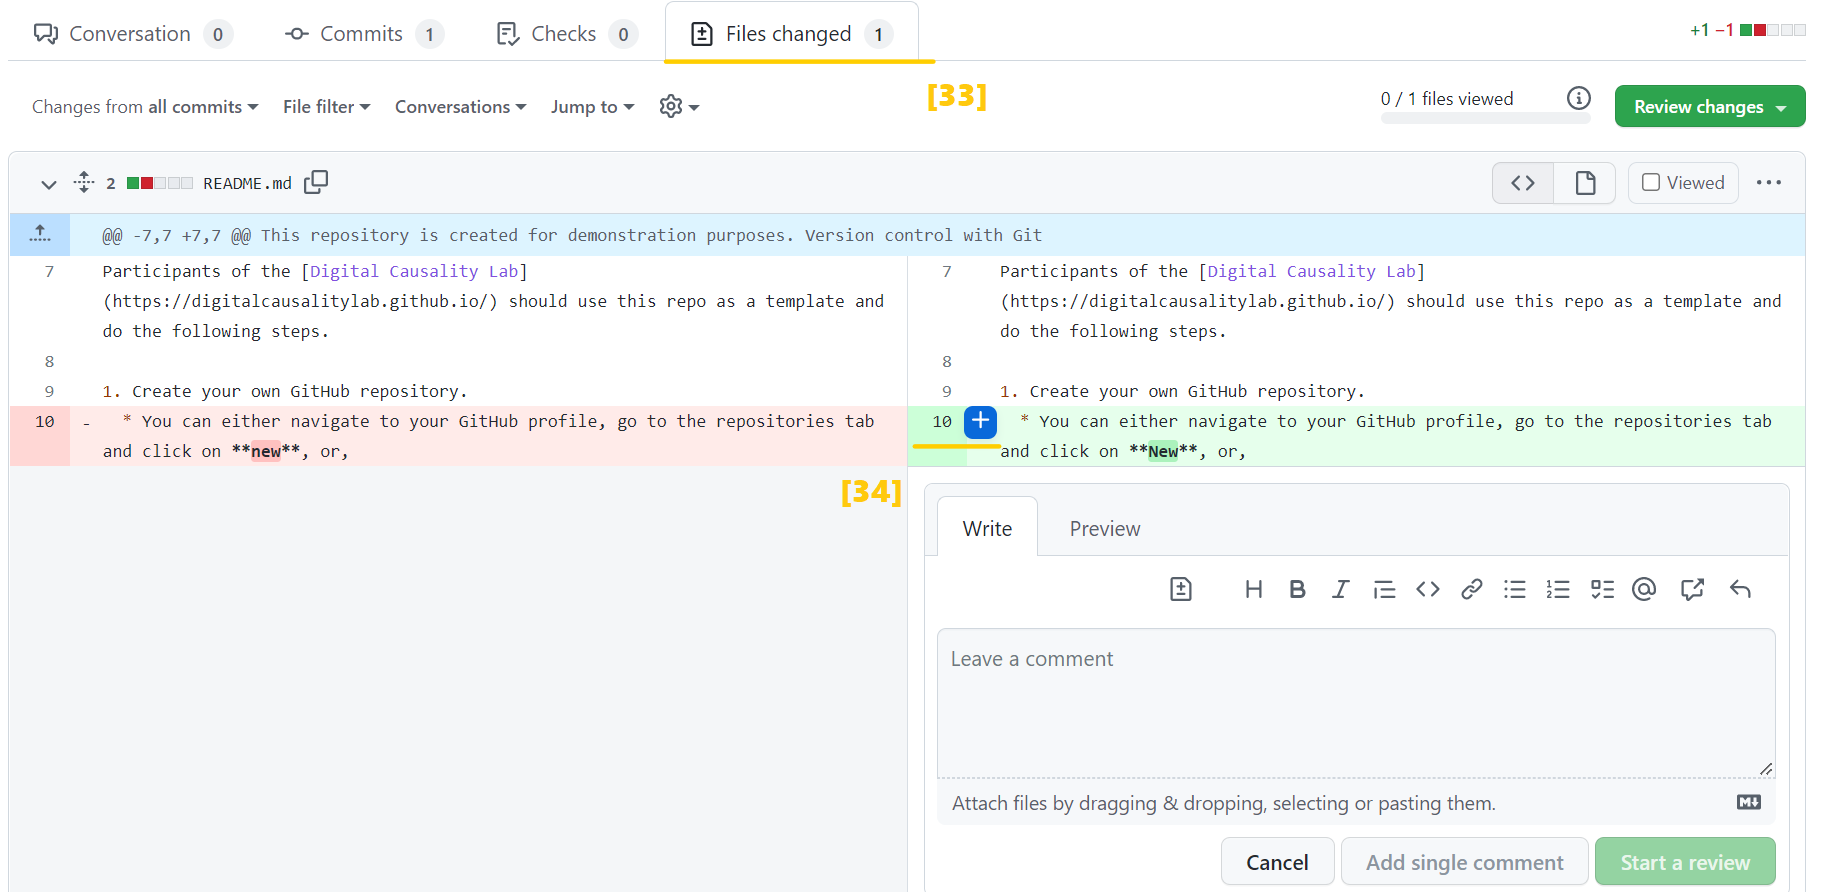
Similar to the discussion thread on an issue, a pull request creates a discussion about the changes being made to the repository. This discussion is found in the conversations [31] tab. The commits [32] view contains information about who is made changes to the files. Each commit represents an updated view of the repository which allows us to see how changes have happened from commit to commit. The files changed [33] view allows you to see the change that is being proposed. We often call this the diff. Notice that some of the text is highlighted in red, this is what has been removed, while the green text is what has been added. If you notice something needs to be change, you can click on the line number in this view to create a line comment [34]. Line level comments are great way to give additional context on recommended changes. Notice that the line comment was added to the main conversation. If your comment is more general in nature, you can also add a comment to the pull request using the same method we learned for issues.

After receiving all the comments and approval from your collaborators, you can merge your branch back into the main branch to publish your changes. Let’s click Merge pull request [35] (see Figure 19)!

🎉 Hooray! Pull request has been successfully merged. The branch can be saved or safely deleted (see Figure 20).

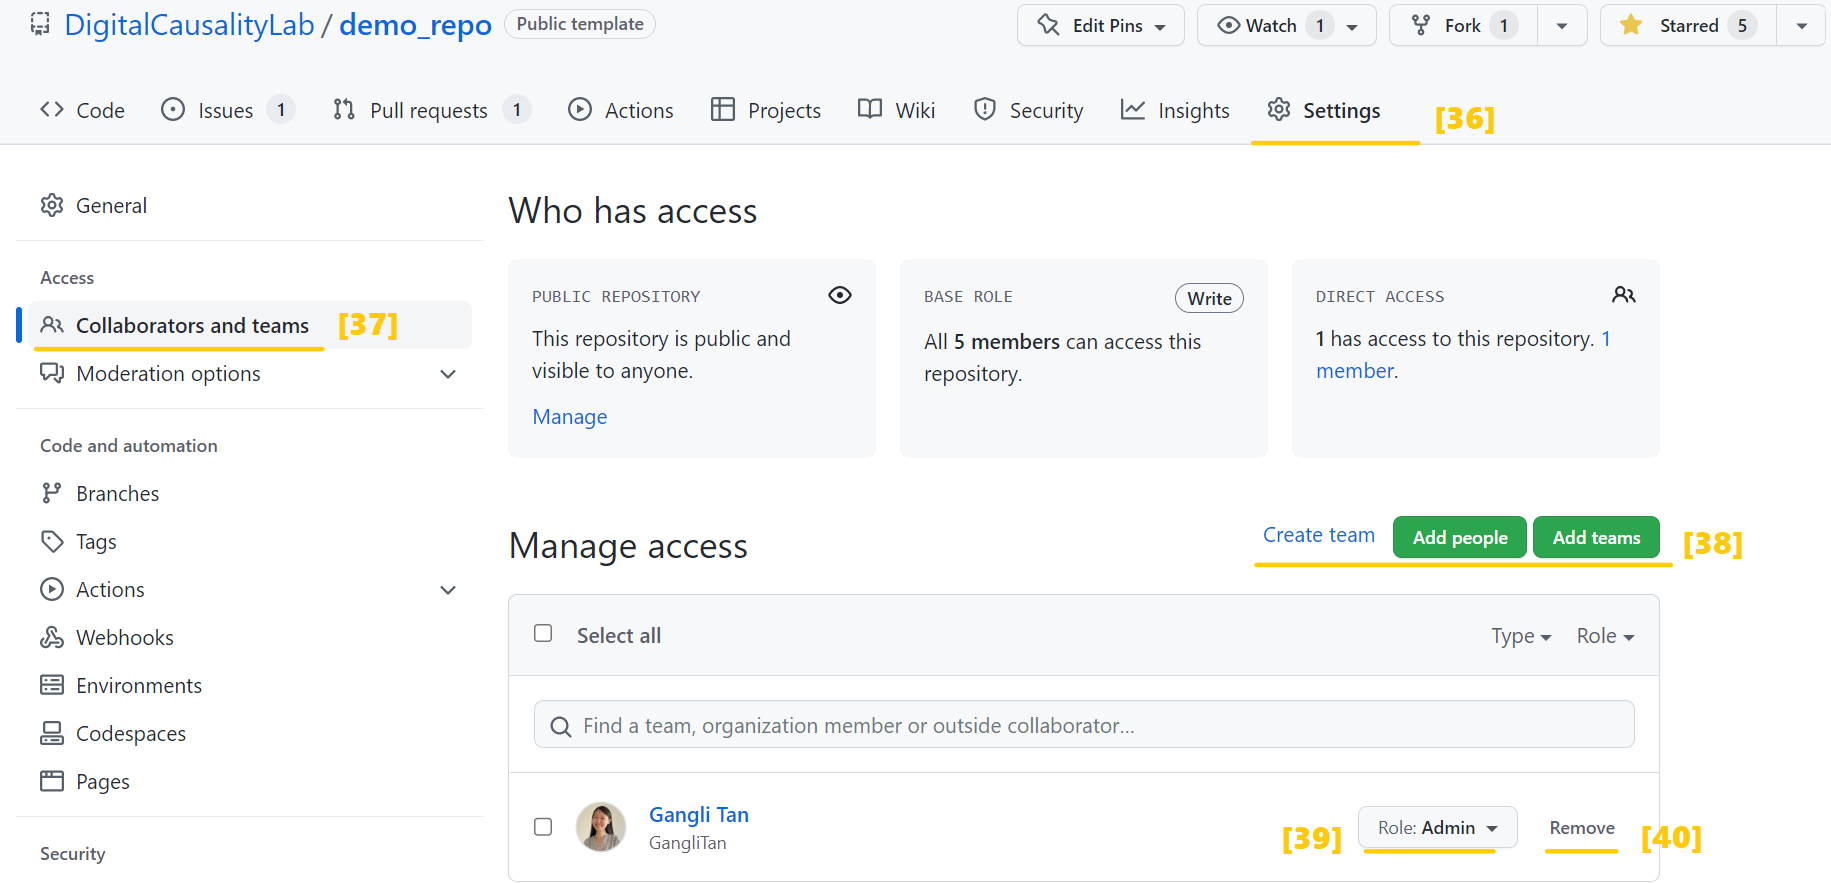
2.5 Collaborators and Teams
For each repository that you administer on GitHub, you can see an overview of every team or person with access to the repository (see Figure 21):
- Navigate to the main page of the repository.
- Under your repository name, click Settings [36].
- In the Access section of the sidebar, click Collaborators and teams [37].
From the overview, you can also invite new people or teams [38], change each team or person’s role [39] for the repository, or remove access [40] to the repository.
3 Working with Git
So far, we worked entirely in our browser: We created a branch, committed one or several changes and merged them into the default branch. However, in many cases, this workflow is not optimal: You want to make some changes locally on your computer, e.g. creating a graphic or editing a presentation using a specific software.
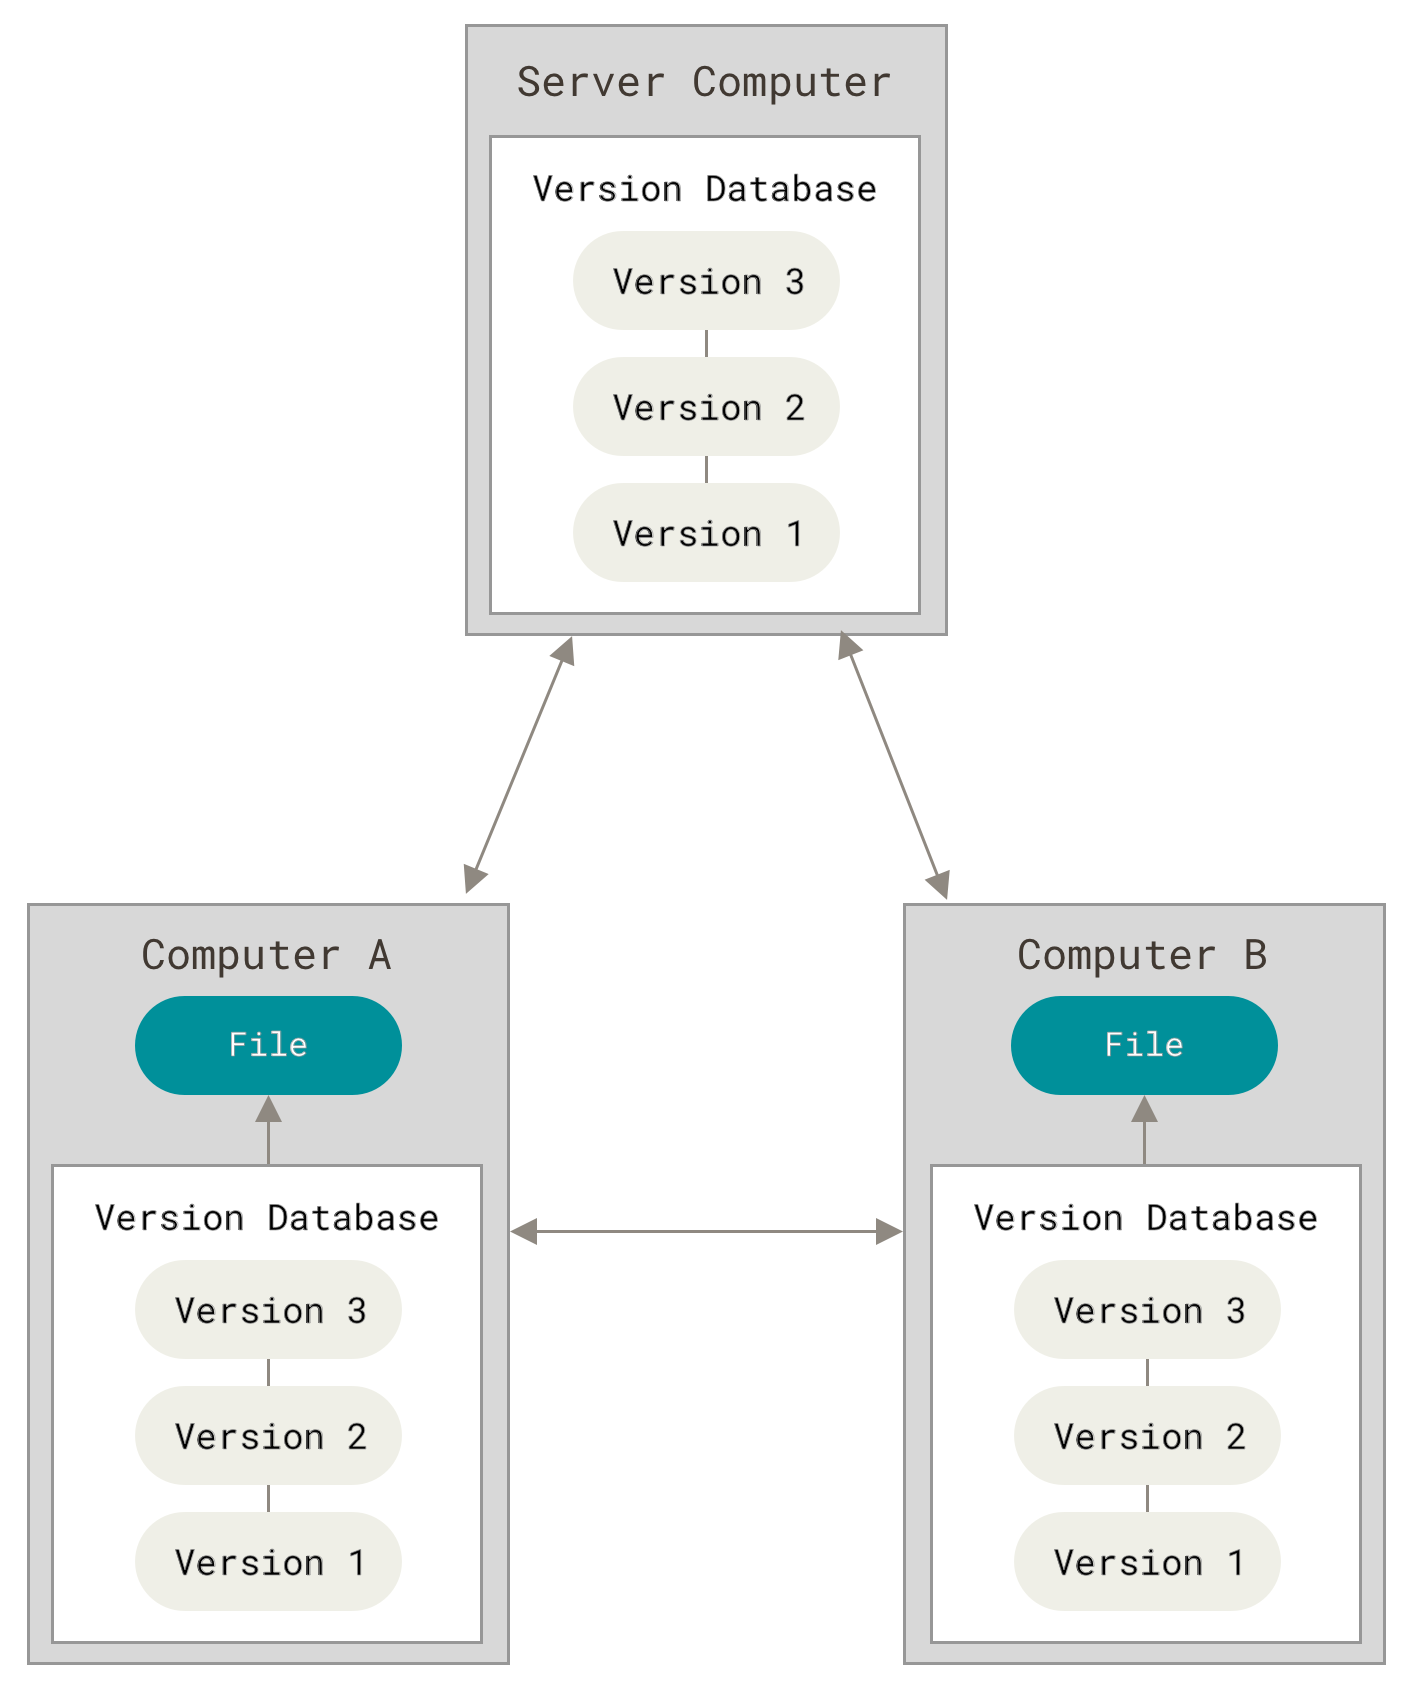
Git is a distributed version control system that helps you to keep track of your local changes as well as the changes made by other collaborators in your GitHub repository. You can imagine a version control system such as Git as a data base that keeps track of all changes to a repository. It creates and maintains a data base of all the different versions of your files, i.e., those that incorporate your changes or the changes made by other collaborators. You can imagine Git to store snapshots of your repository and saving them in a distributed way. For example, if you use Git in combination with GitHub, your files will be hosted in the cloud. Once you push your local changes, they won’t get lost again. Git is the tool that manages the communication between your local computer, the local machines of your collaborators and the server computer.
To sum up: We have to use Git to make sure our local changes are being integrated in the remote repository on GitHub2 and, similarly, our local repository integrates the changes of other collaborators. This sounds complicated, but we will see that we only need a handful of Git commands.
3.1 The Three States of Git
Before we start with our first steps in Git, we will learn about three states, that files can have in Git:
modified: A file has been changed on your computer, but your collaborators can’t see that you have made a change.staged: You have marked that the modified file is now the current version and you are going to include it in your next commit snapshot.committed: You store your change in local database.
The only thing that you have to do after you committed a change is to push it, i.e., to add your changes to the remote repository. This is necessary because your collaborators can’t know about your change if it is not integrated in the remote repository.
3.2 Install Git on your local machine
Git itself is a tool that can be used through the command line. In case you use a Mac or Linux operating system, you should know how to open the terminal. If you don’t know it, you can read it up here. If you use Windows, you install a program called Git Bash, and open it after successful installation. It is also possible to use a graphical user interface (= GUI), which you can find on this overview.
Before we get started, we have to install Git on our machines. Follow these installation instructions to install Git on your computer.
After successful installation, open the terminal (MacOS, Linux) or open Git Bash (Windows). In a next step, you have to configure your account details. To do this, type the following commands3 (and replace the placeholders by your data)
$ git config --global user.name "John Doe"
$ git config --global user.email johndoe@example.com
You can view your settings with
$ git config --listIf you need help for a specific Git command, you can either google the Git command or you can type the command with the option -h, for example
$ git add -hIn the following we will demonstrate how you can use Git from the command line (terminal or Git Bash) and how you can use it via the GUI GitHub Desktop. You can use GitHub Desktop for free once you have registered at GitHub (see above). Alternatively, you could also use GitKraken, which is a nice GUI included in the [GitHub Student Developer Pack]. Sometimes, GitHub Desktop and GitKraken help to circumvene some issues related to authentication.
3.3 Clone a repository
In this tutorial, we will focus on a workflow that departs from an already existing GitHub repository, which we will then clone. Cloning means that we create a local copy of the GitHub repository on our computer. Assume you have a GitHub repository with an url https://github.com/[USERNAME]/[REPONAME]
$ git clone https://github.com/[USERNAME]/[REPONAME]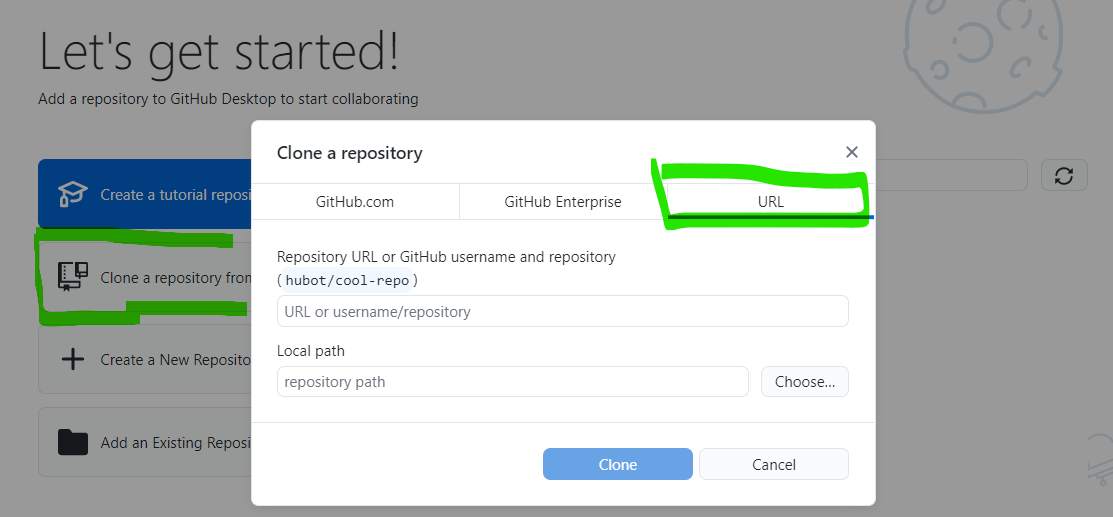
You can always check the status of your local repository via
$ git statusWhen you type git status after cloning the repository, you should expect to see the output message
$ git status
On branch main
Your branch is up to date with 'origin/main'.

nothing to commit, working tree clean- Clone the GitHub repository you created earlier and check the status!
- You can change your current working directory to save the Git repository in another place on your computer. Use the command
cdto show and change your current working directory. Typedirto list all files in a directory.
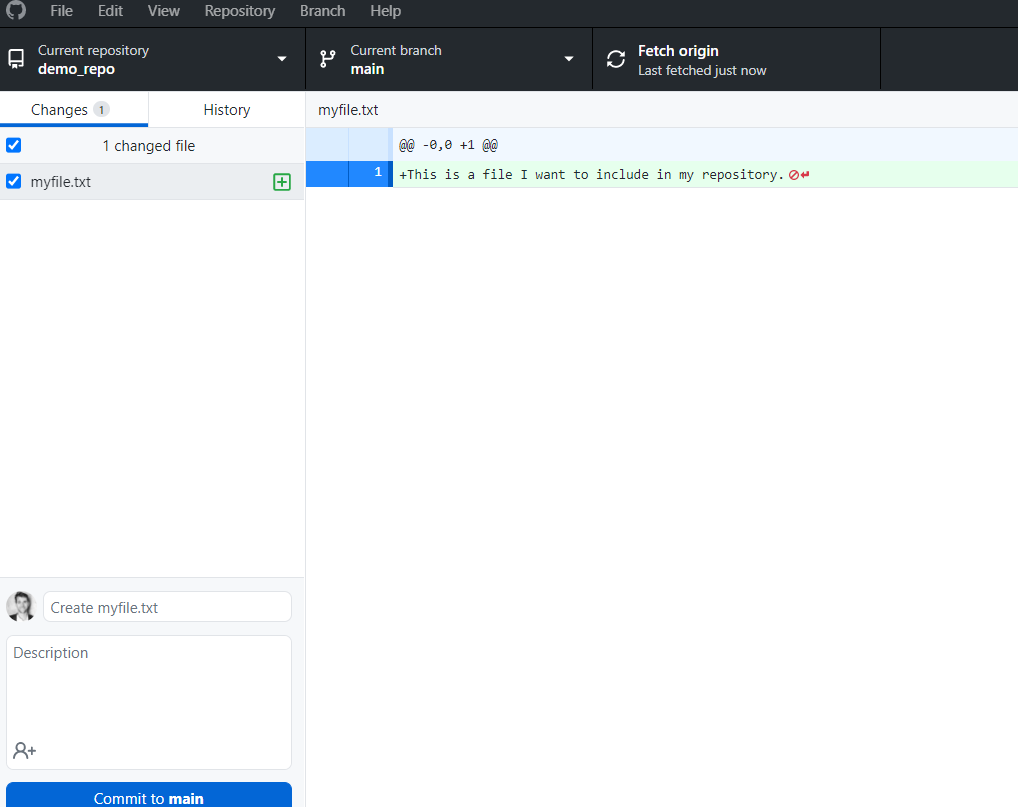
3.4 Make a local change: Adding a file
Now, let’s make a change. For example, we want to add a new file to our repository. In our example, we will save a simple .txt file, but it would work the same way if you’d rather want to add another file like a Word, Powerpoint or Excel file (.docx, .pptx, .xlsx).
We open an editor, paste the text This is a file I want to include in my repository. and save the file as myfile.txt file.
Type git status to see whether your change has been successful. You will get the output
$ git status
On branch main
Your branch is up to date with 'origin/main'.

Untracked files:
  (use "git add <file>..." to include in what will be committed)
        myfile.txt

nothing added to commit but untracked files present (use "git add" to track)
Hence, Git knows that a file was added, but the change has not been incorporated in the data base. In order to add the file in our version control, we type
$ git add myfile.txtAgain, type git status to get the message
$ git status
On branch main
Your branch is up to date with 'origin/main'.

Changes to be committed:
  (use "git restore --staged <file>..." to unstage)
        new file:   myfile.txt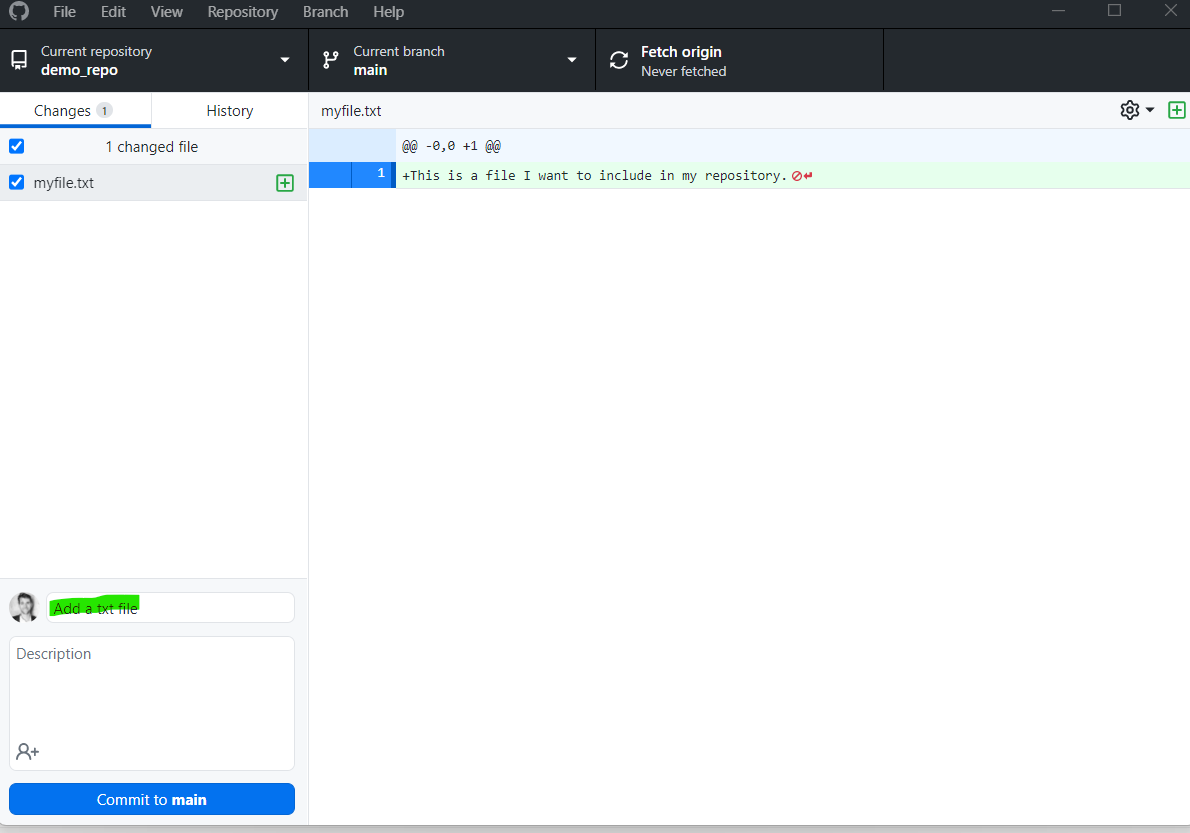
So, Git knows that a file was added. However, the change has not been committed yet. This is done via
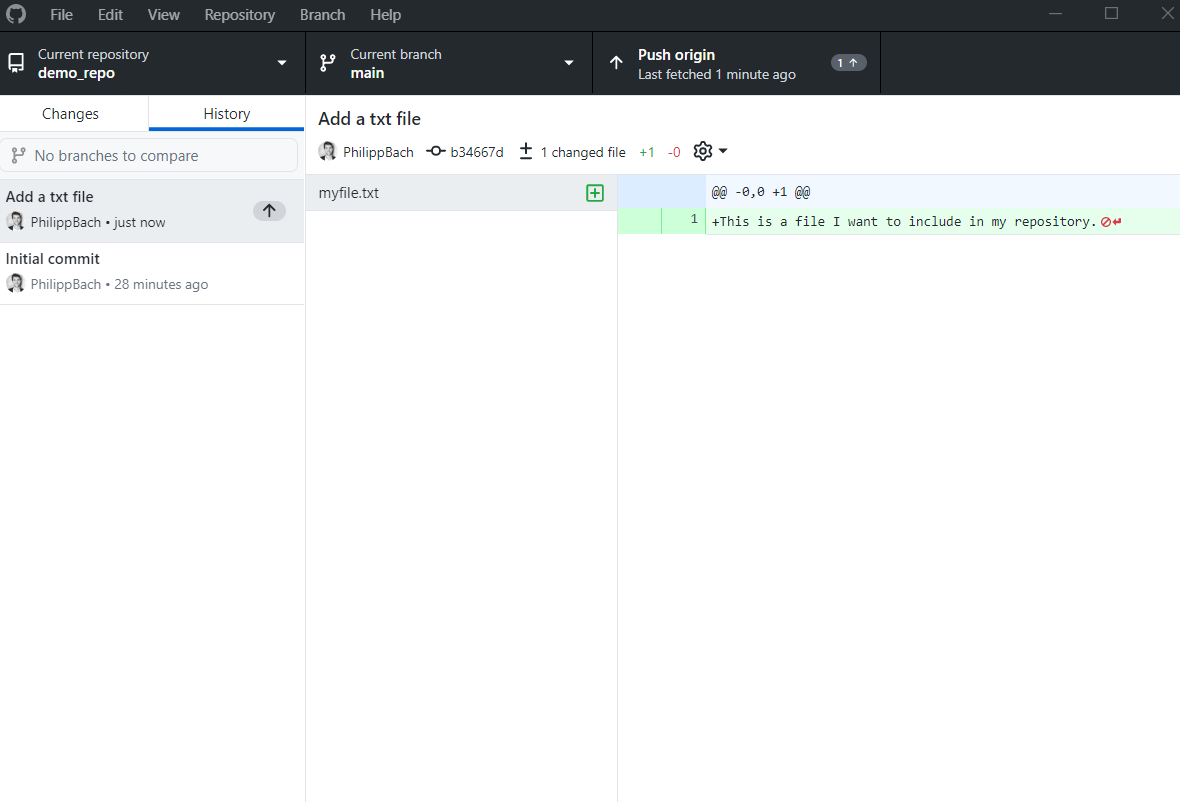
$ git commit -m "Add a txt file"
[main 048e930] Add a txt file
 1 file changed, 1 insertion(+)
 create mode 100644 myfile.txt
The flag -m makes it possible to add a brief commit message, which explains our changes. We’d recommend you to use meaningful commit messages because this will make it easier for others (including your future You) to understand why you made that change. Again, call git status
$ git status
On branch main
Your branch is ahead of 'origin/main' by 1 commit.
  (use "git push" to publish your local commits)

nothing to commit, working tree clean
This output says that we committed our change, and that our version of the repository is one commit ahead of the remote repository (origin/main).
- Visit your GitHub repository. Can you find the file
mytext.txtthere?
3.5 Getting your local change to your GitHub repository
The thing we are missing is to synchronize our local repository with the remote. When you want to get your changes incorporated in a remote repository, you have to push them via the command git push <remote> <branch>. As we are currently working on the default branch (which is called main) in our example, we type
$ git push origin main
Enumerating objects: 4, done.
Counting objects: 100% (4/4), done.
Delta compression using up to 8 threads
Compressing objects: 100% (3/3), done.
Writing objects: 100% (3/3), 324 bytes | 324.00 KiB/s, done.
Total 3 (delta 1), reused 0 (delta 0), pack-reused 0
remote: Resolving deltas: 100% (1/1), completed with 1 local object.
To https://github.com/DigitalCausalityLab/demo_repo
   737fc5a..048e930  main -> main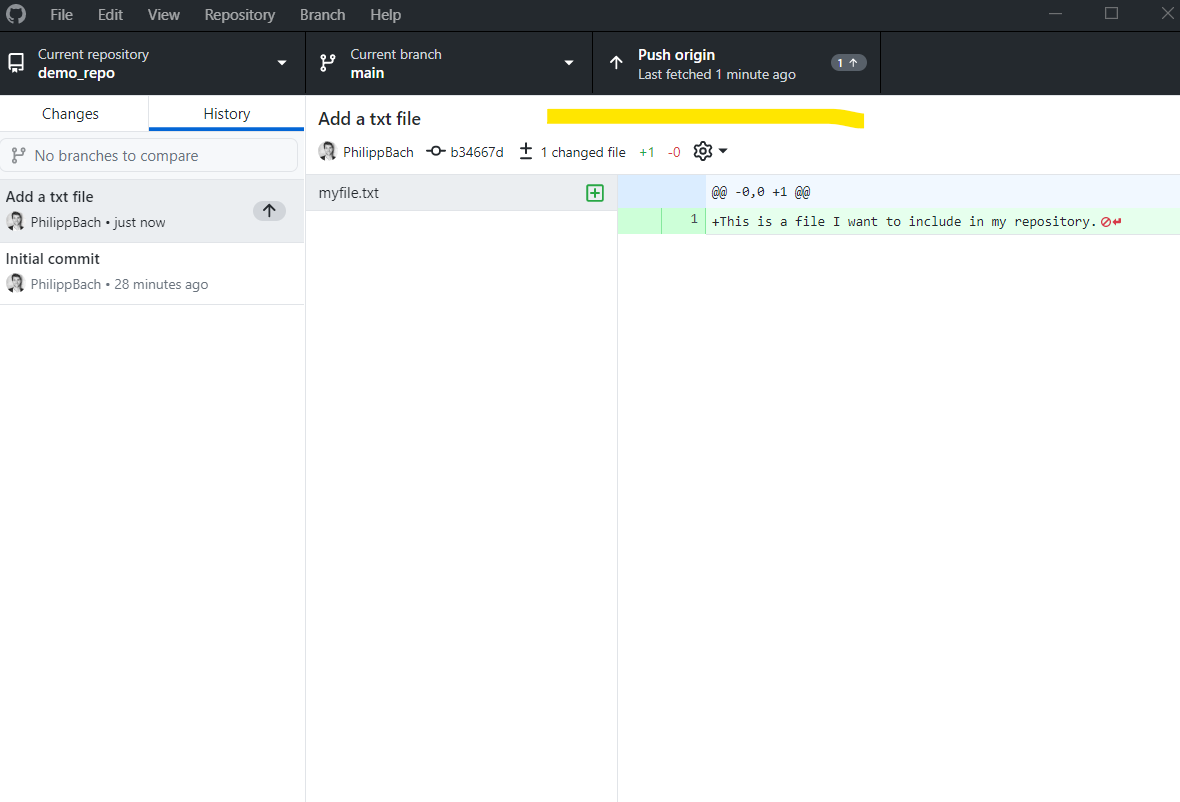
For now you can consider origin in the command above as a synonym for your GitHub repository.
- Visit your GitHub repository. Can you find the file
mytext.txtnow?
🎉 Congratulations! You just committed your first change and pushed it to GitHub!
3.6 Getting changes from GitHub
We just added our changes to the GitHub repository. What if your collaborators do the same? How can you incorporate their changes in your local version? The answer to this is pull: Pull means that you see the changes that others committed to the remote repository also in your local repository.
$ git pull
Already up to date.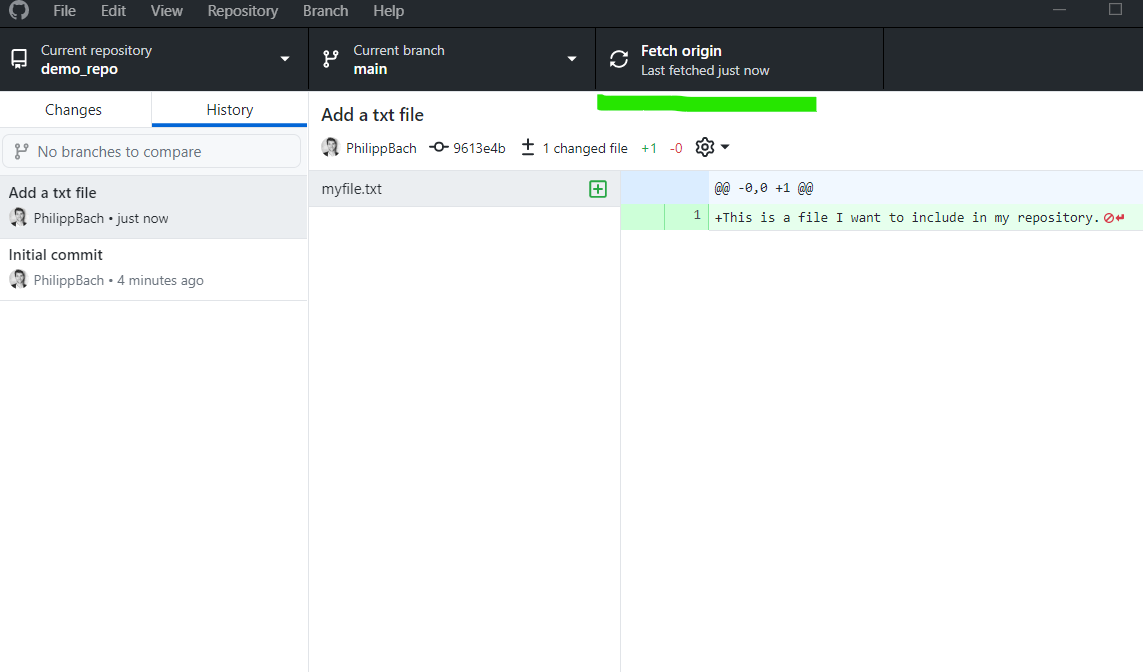
In our example, no other changes have been added to the GitHub repository.
3.7 Branching with Git
In our example above, we committed our change directly to the main branch. As we learned in our introduction in Section 2.2, branching is a very useful feature of Git. You can create a new branch using git branch <name>, for example
$ git branch clean-upAgain, check the status
$ git status
On branch main
Your branch is up to date with 'origin/main'.

nothing to commit, working tree clean
We created a branch, but we are still on the branch main. We can switch to our new branch by
$ git checkout -b clean-up
Switched to branch 'clean-up'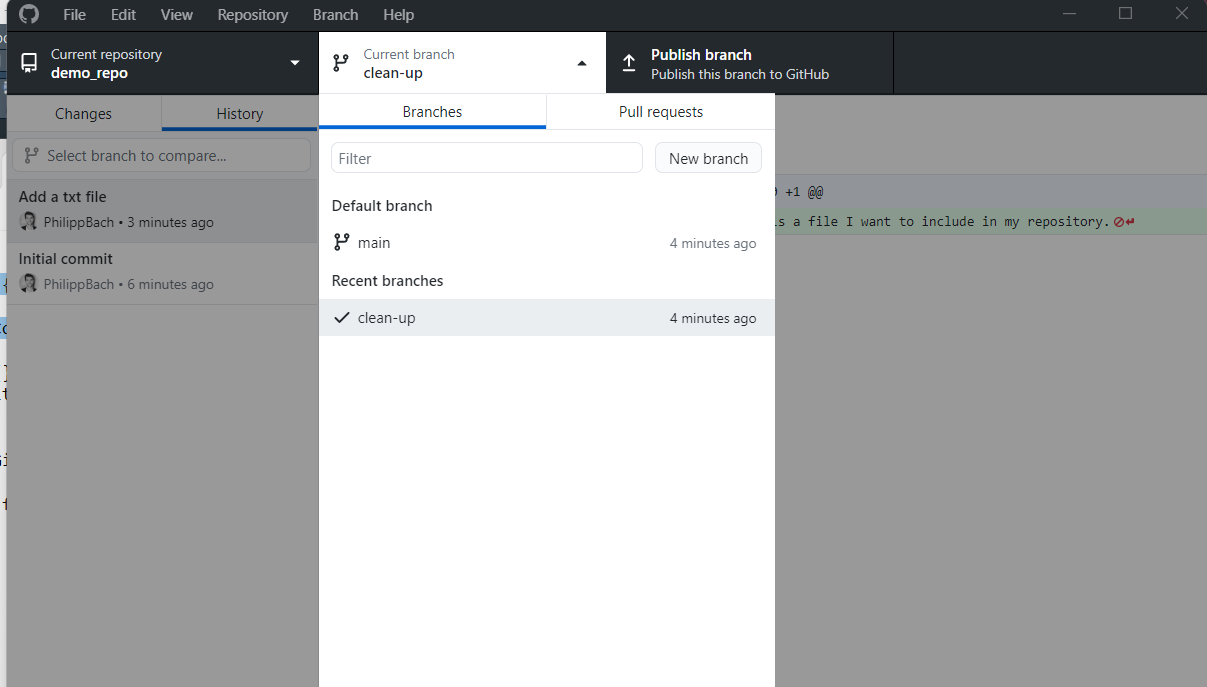
- Visit your GitHub repository. Can you find the branch
clean-upthere?
To make you branch available in the GitHub repository, we still have to push it as it will otherwise only be in your local repository.
$ git push origin clean-up
Total 0 (delta 0), reused 0 (delta 0), pack-reused 0
remote:
remote: Create a pull request for 'clean-up' on GitHub by visiting:
remote:      https://github.com/PhilippBach/demo_repo/pull/new/clean-up
remote:
To https://github.com/PhilippBach/demo_repo.git
 * [new branch]      clean-up -> clean-up
Now, we will commit another change on the branch clean-up.
In our example we used
git checkout -b clean-upto create a new branch and to switch to it immediately.Alternatively, we could use
git switch <clean-up>. This does not create a new branch by default, but rather switches to an existing branch or creates a new branch if it doesn’t already exist. To create a new branch and switch to it using git switch, you need to specify the-cor--createoption.
Now, delete the file
myfile.txtagain and commit this change. You can add all changes by the commandgit add --all.After pushing your changes, go to your GitHub repository and verify that you can see your change on the branch
clean-upthere.
The last step is now to merge your changes to the main branch. You can do this either by visiting the URL https://github.com/[USERNAME]/[REPONAME]/compare/clean-up?expand=1 and add a summary of your changes there. Or you can go to the Pull requests tab of your GitHub repository and click on the New pull request button there.
After you created the pull request, you can merge it.
Open and merge the pull request, i.e., merge the changes from
clean-upto the main branch.After you merged the pull request, switch to the main branch again and pull the latest version.
🎉 Congratulations! You just merged your first pull request using Git and GitHub!
You have made your first step with Git and GitHub. Now, you are ready to use version control in your own project based on this simple workflow.
4 Helpful Resources
You may find the following resources helpful if you continue to work with Git!
- Introduction to GitHub repository: https://github.com/skills/introduction-to-github
- GitHub quickstart: https://docs.github.com/en/get-started/quickstart
- GitHub glossary: https://help.github.com/articles/github-glossary/
- Pro Git (free book): https://git-scm.com/book/en/v2
- Git cheat sheet
Footnotes
The Markdown syntax is not only supported in items but basically every text files in GitHub, for example, when you open and discuss pull requests (see below).↩︎
For simplicity, you can replace the term “remote repository” by “GitHub repository”. In our course, we will use Git in combination with GitHub only.↩︎
Please don’t copy and paste the
$in front of the code. It just indicates that this is the code and the remaining part in the code cell is the output.↩︎